Part of the Google Analytics for Blogs Package.
Most content-driven sites use taxonomies, especially categories and tags, to organize their posts. This is so common that almost all content management systems, from WordPress to Hugo, have built-in taxonomies for categories and tags.
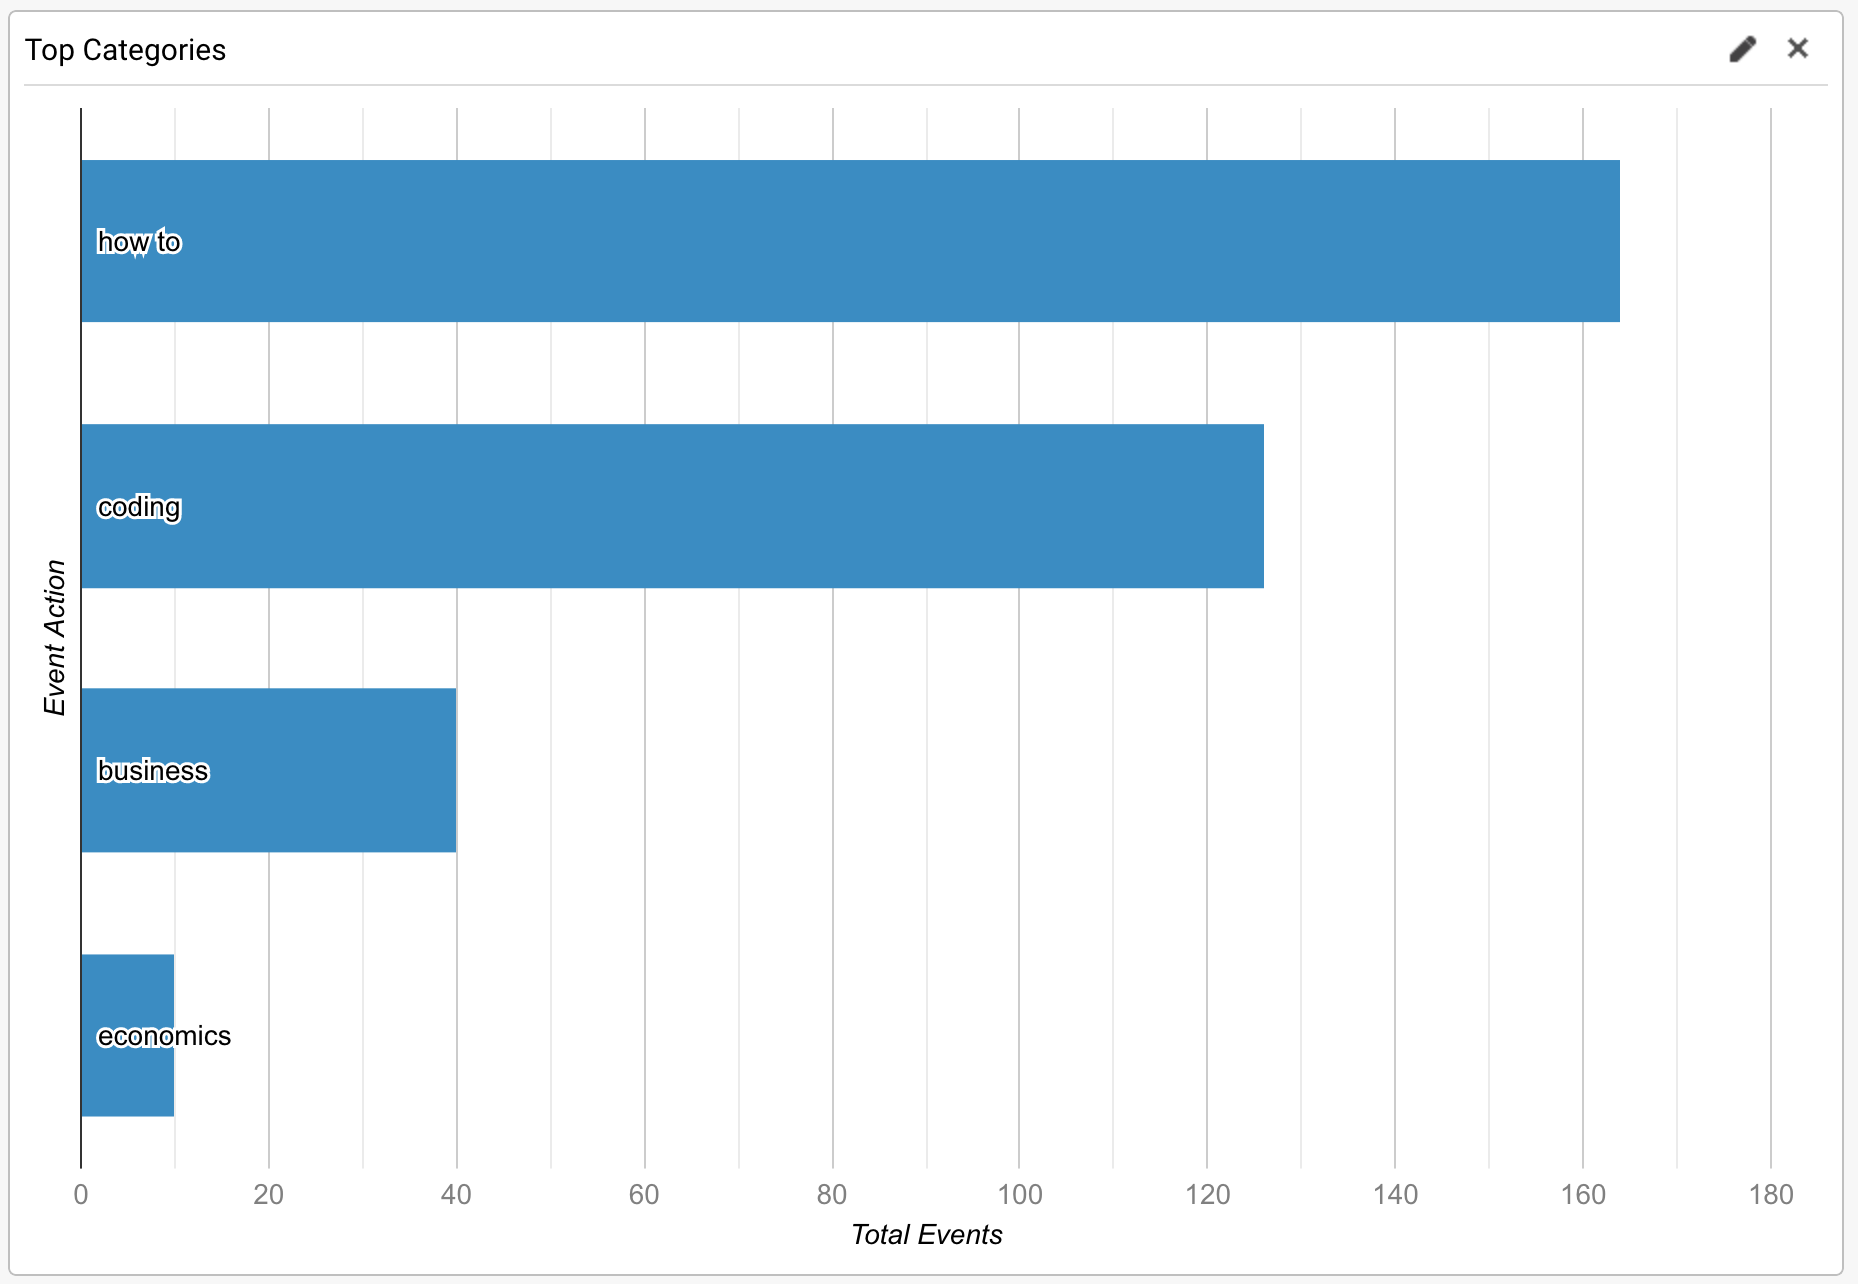
However, there’s no convenient way to capture these taxonomies in Google Tag Manager or track them in Google Analytics. Content Groupings only allow you to set one grouping per page, so that won’t work if you have multiple categories or tags for the same post.
You can capture them as custom dimensions (and I do) but you can’t create a graph like the one above because all the taxonomy’s values are stored as a single string in the custom dimension like so:
To get the graph above, you need a way to track each taxonomy value (in this case, each category) separately, as demonstrated by Mixed Analytics, using events.
With this Taxonomy Tracker template, you can now do this without writing any javascript. The Taxonomy Tracker is compatible with any site but works particularly well with DuracellTomi’s Google Tag Manager WordPress Plugin.
Here’s how to use it.
Table of Contents
Installation
Thanks to Google Tag Manager’s new custom template feature, installing the Taxonomy Tag requires just a few clicks.
First, download the Taxonomy Tag template file here.
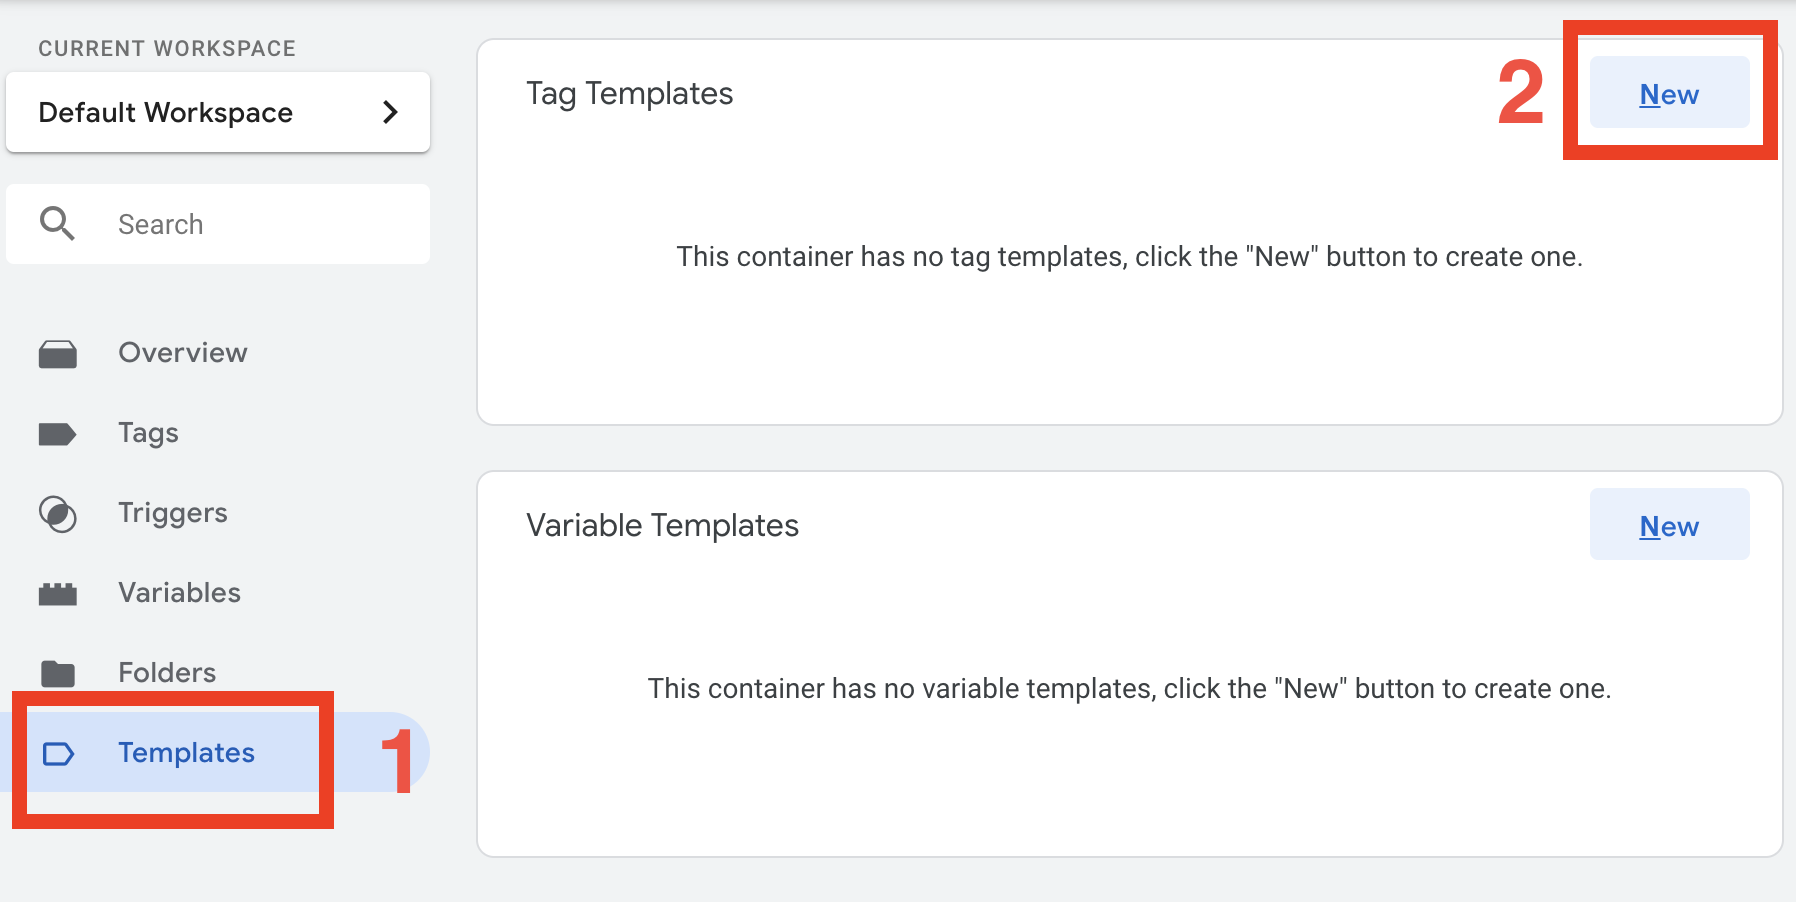
Next, in your Tag Manager container select Templates > New.
Then, click three dots > Import
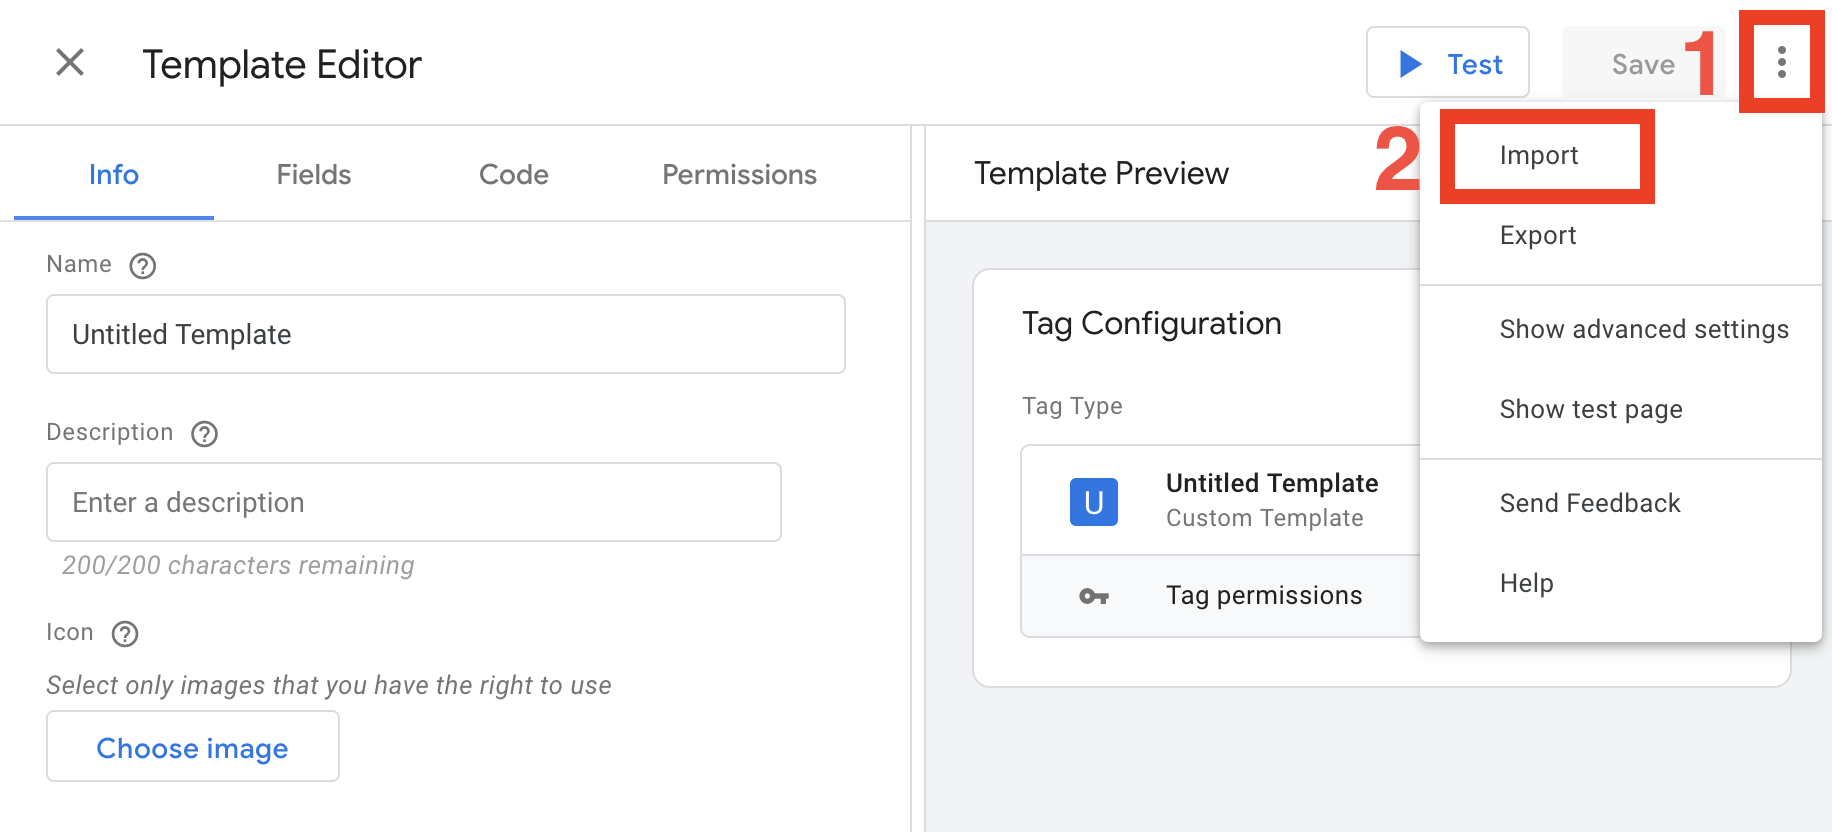
Upload the taxonomyTrackerTemplate.tpl file and click Save.

You’ve installed the template. Now let’s use it.
How to Use It
Once you’ve installed the Taxonomy Tracker, when you create a new tag you can select it as the “tag type”.
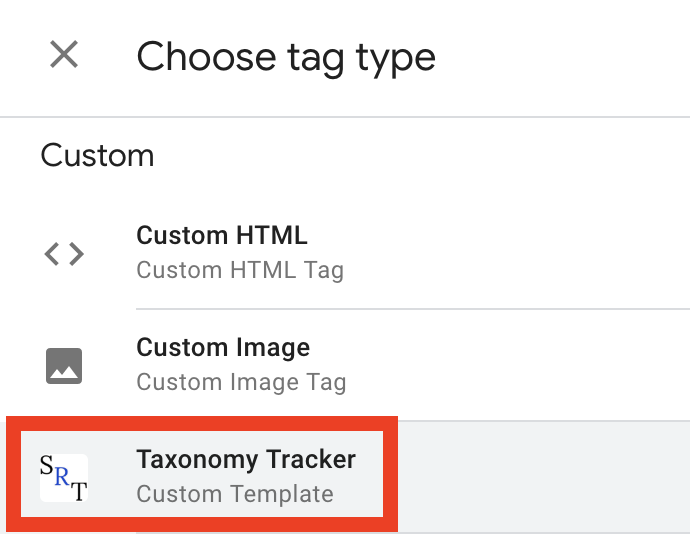
Do so, and you’ll see the following configuration options.
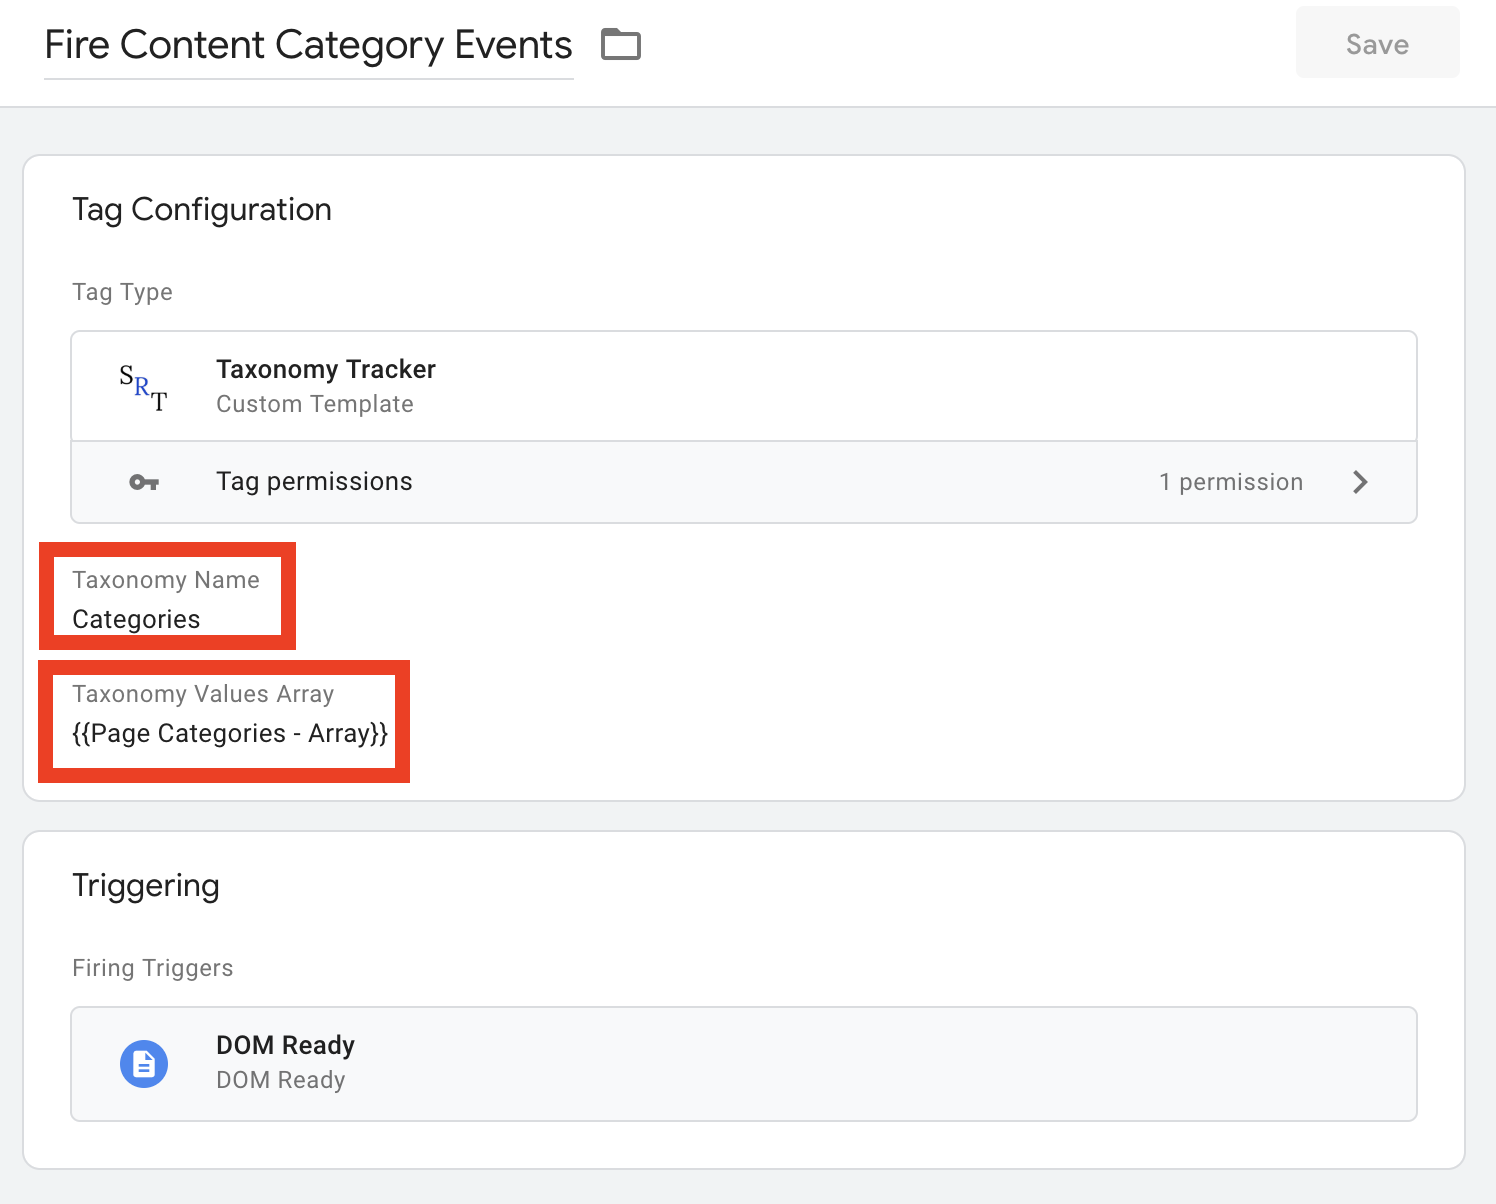
For the Taxonomy Name option simply enter whatever you want to call the taxonomy in Google Analytics (more on how this works shortly), in this case, I’d call it “Categories”.
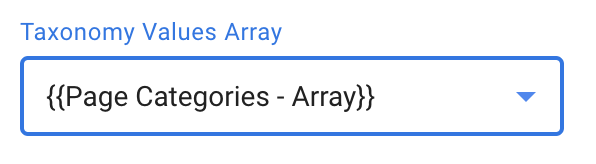
For the Taxonomy Values Array select the Tag Manager variable that stores the array of taxonomy values (ie the list of categories).
How you create this variable will depend on your Content Management System and Google Tag Manager setup. I’ll demonstrate how to set up the variable using WordPress and DuracellTomi’s Google Tag Manager Plugin.
Create a Taxonomy Values Array Variable
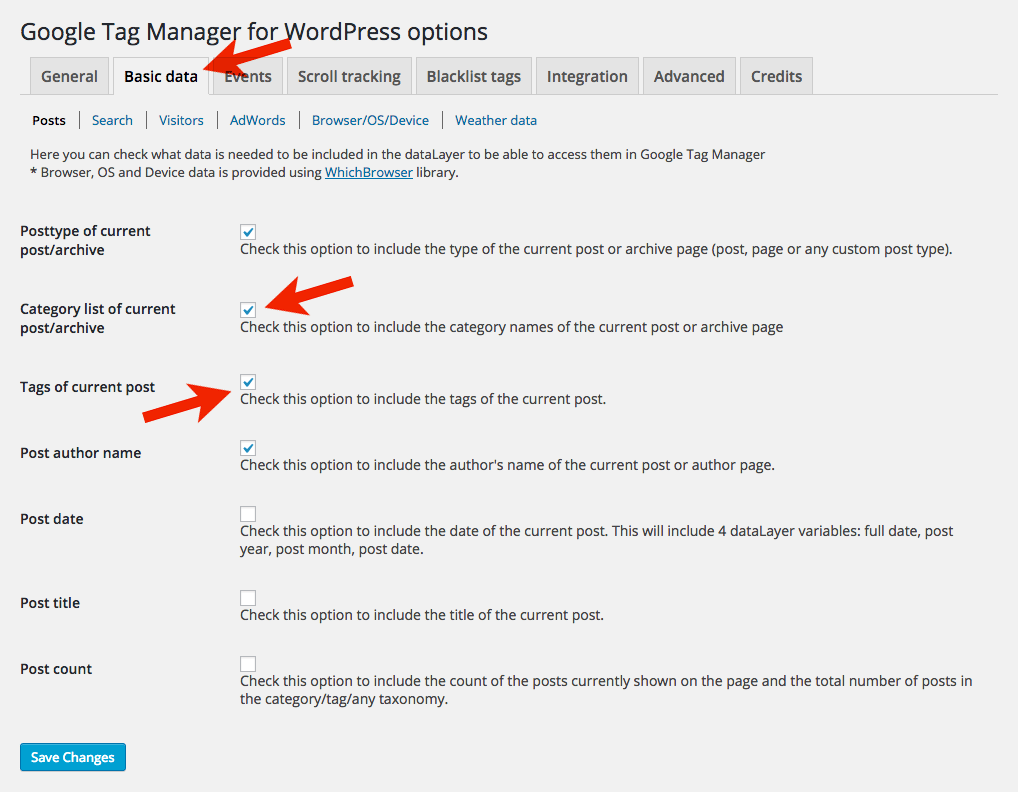
After you’ve installed DuracellTomi’s Plugin, you’ll need to make sure the plugin is configured to send both categories and tags to the datalayer like so:
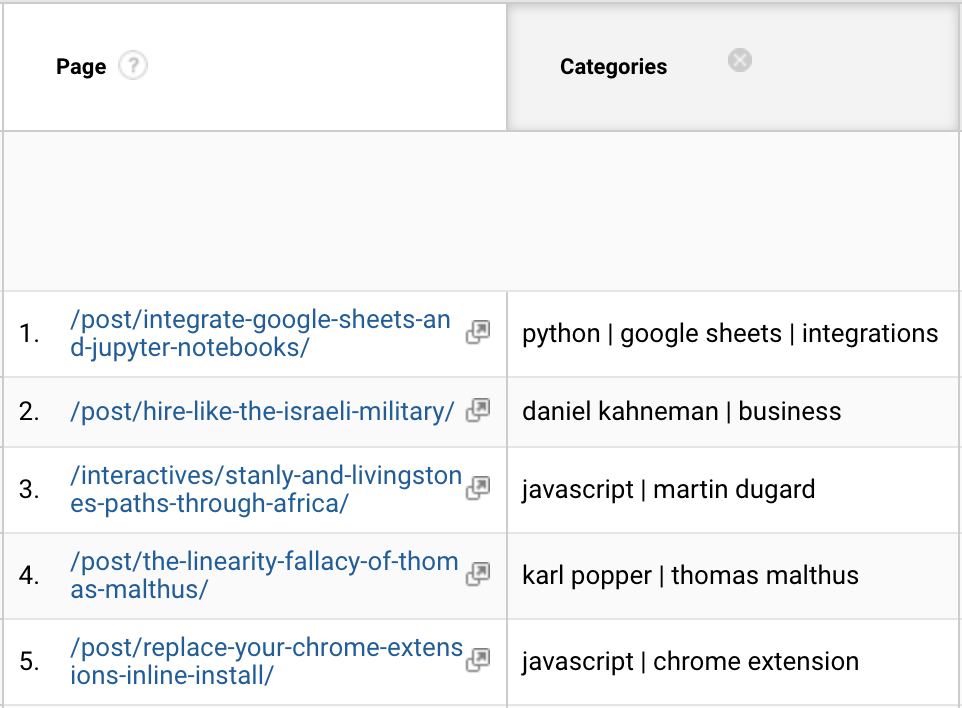
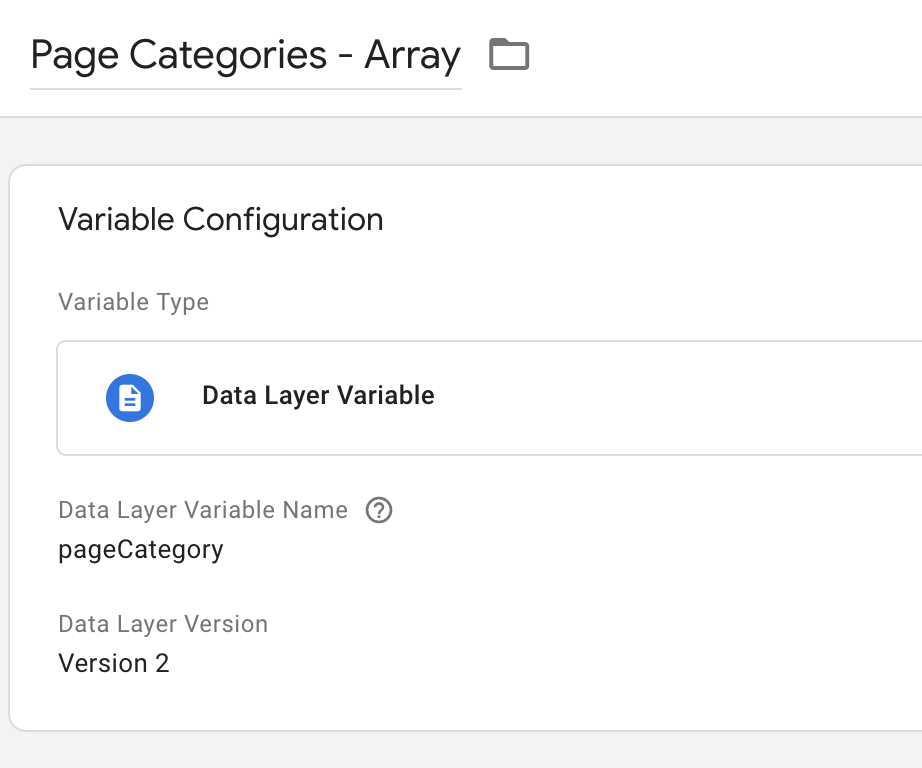
Once the Plugin is installed and configured, you can see a post’s categories and tags in the datalayer, under the key “pageCategory” and “pageAttributes”, respectively.

To use these in the Taxonomy Tracker, simply create a Tag Manager datalayer variable for each one. For instance, to capture categories I would create a datalayer variable like so:
Now that you have your taxonomy values captured in Tag Manager variables, you can simply select them in the drop-down menu for the **Taxonomy Values Array **configuration option, like so:
How It Works
Alright, now that we’ve got the Taxonomy Tracker set up and working, we can connect it to Google Analytics or whatever other analytic platform or marketing service where using. To do so, we’ll first have to take a quick look at what the Taxonomy Tracker does.
In the section just above we configured the tracker’s Taxonomy Name to “Categories” and the Taxonomy Values Array to the Page Categories - Array variable, which, in the example, has the values ‘python’ and ‘google sheets’.
Here’s the tracker will do with that configuration:
Loop through each value in the
Taxonomy Values ArrayFire a datalayer event called
taxonomyTrackerSet the datalayer attribute
taxonomyValueto the current taxonomy value in the loop (ie first ‘python’, then ‘google sheets’)Set the
taxonomyNameattribute to the given Taxonomy Name (ie “Categories”)
Here’s what the datalayer looks like for the first category, “python”:
{
    event: ‘taxonomyTracker’,
    taxonomyValue: ‘python’,
    taxonomyName: ‘Categories’
}
And for the second categories, “google sheets”:
{

    event: ‘taxonomyTracker’,

    taxonomyValue: ‘google sheets’,

    taxonomyName: ‘Categories’

}
Now you can use the datalayer event taxonomyTracker as a trigger whenever you want to taxonomy values separately to some service, for instance, Google Analytics.
Connecting to Google Analytics
Now that our Taxonomy Tracker is set up and firing a taxonomyTracker event in the datalayer for each category of our post, we’re finally ready to configure it to send the category data to Google Analytics.
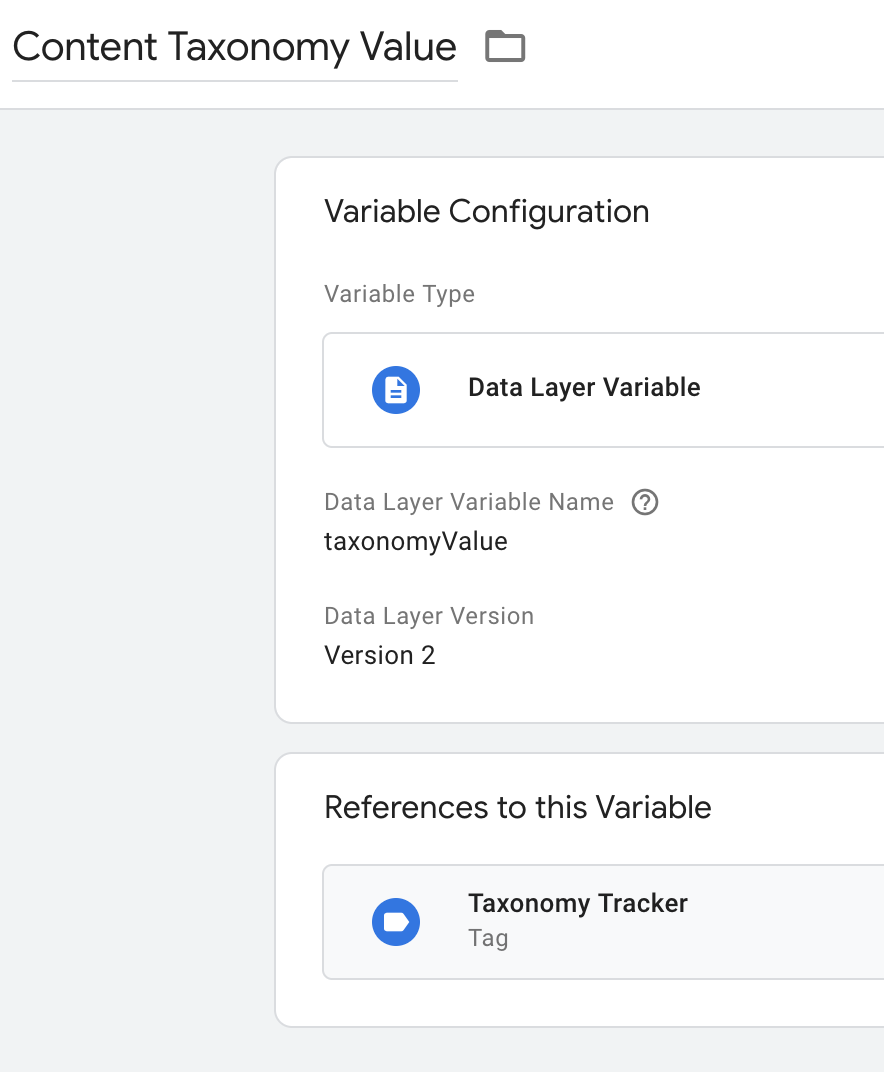
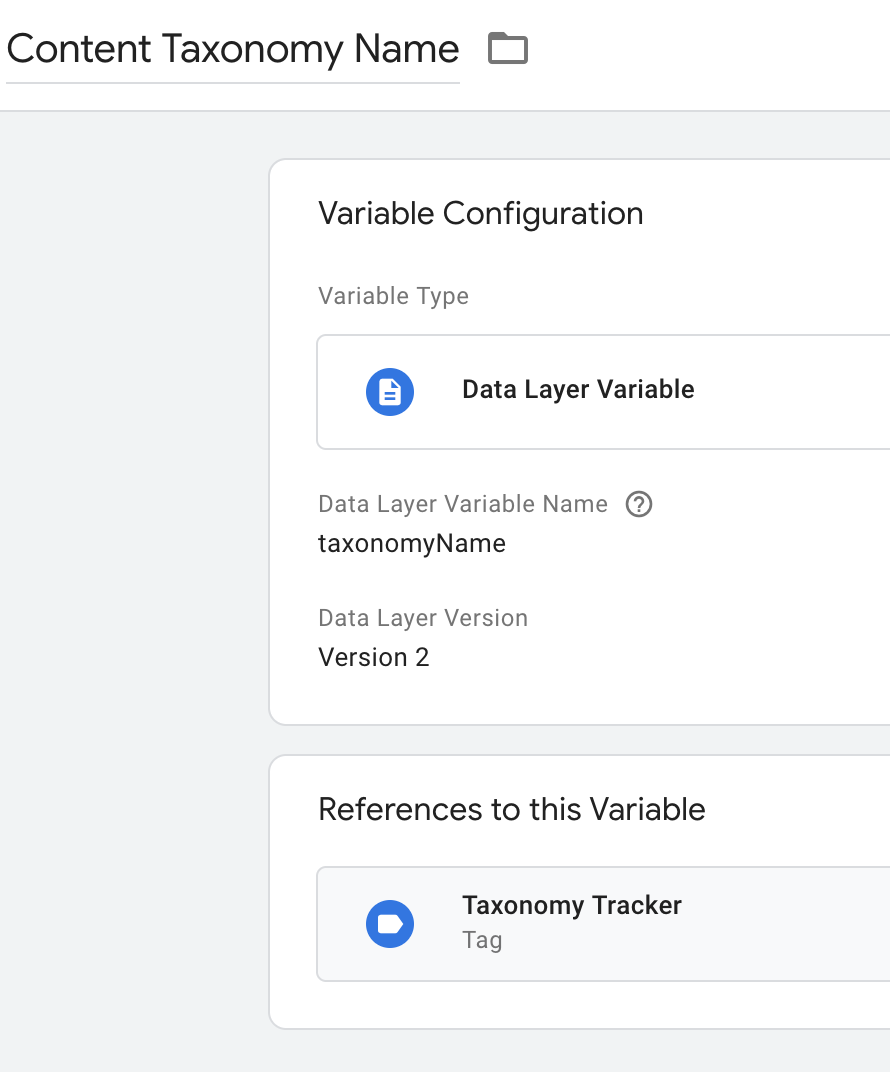
First, we’ll want to capture the taxonomyValue and taxonomyName datalayer attributes as Tag Manager datalayer variables.
Here’s what those look like:
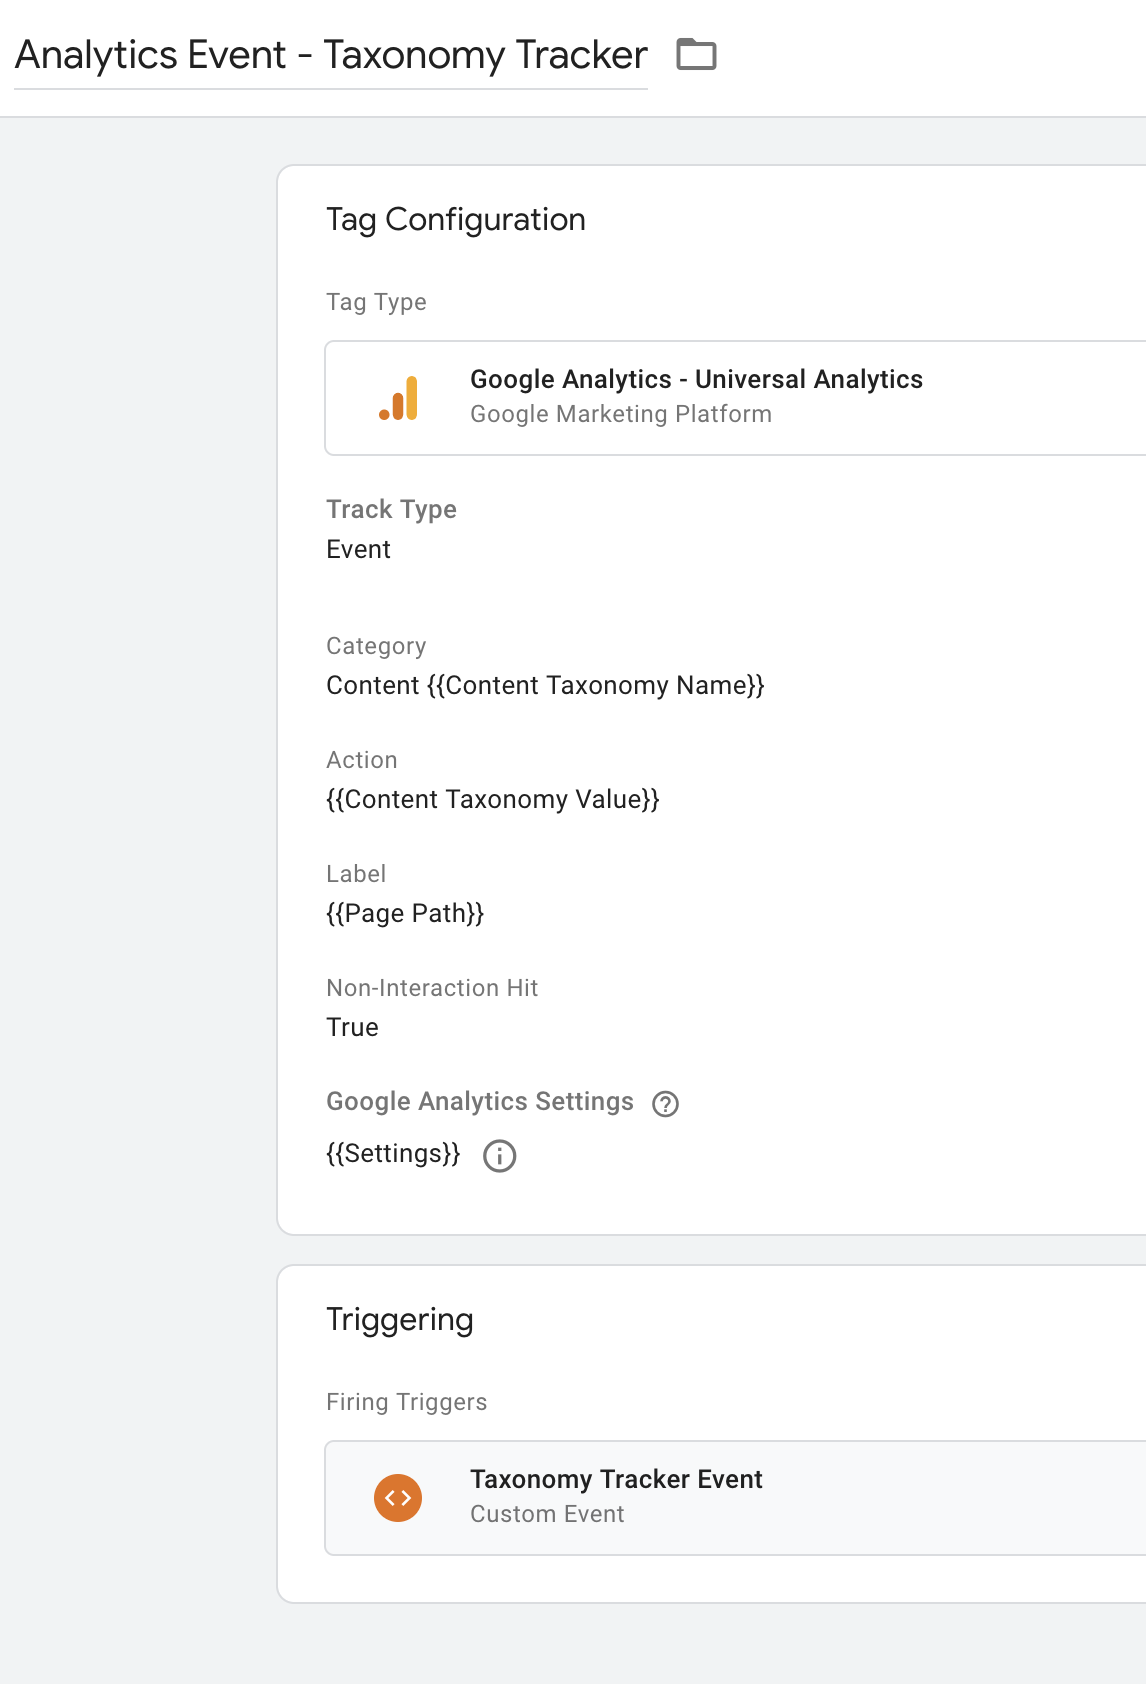
Then, we want to send a separate Google Analytics Event for each category. Here’s what my Google Analytics Event tag looks like:
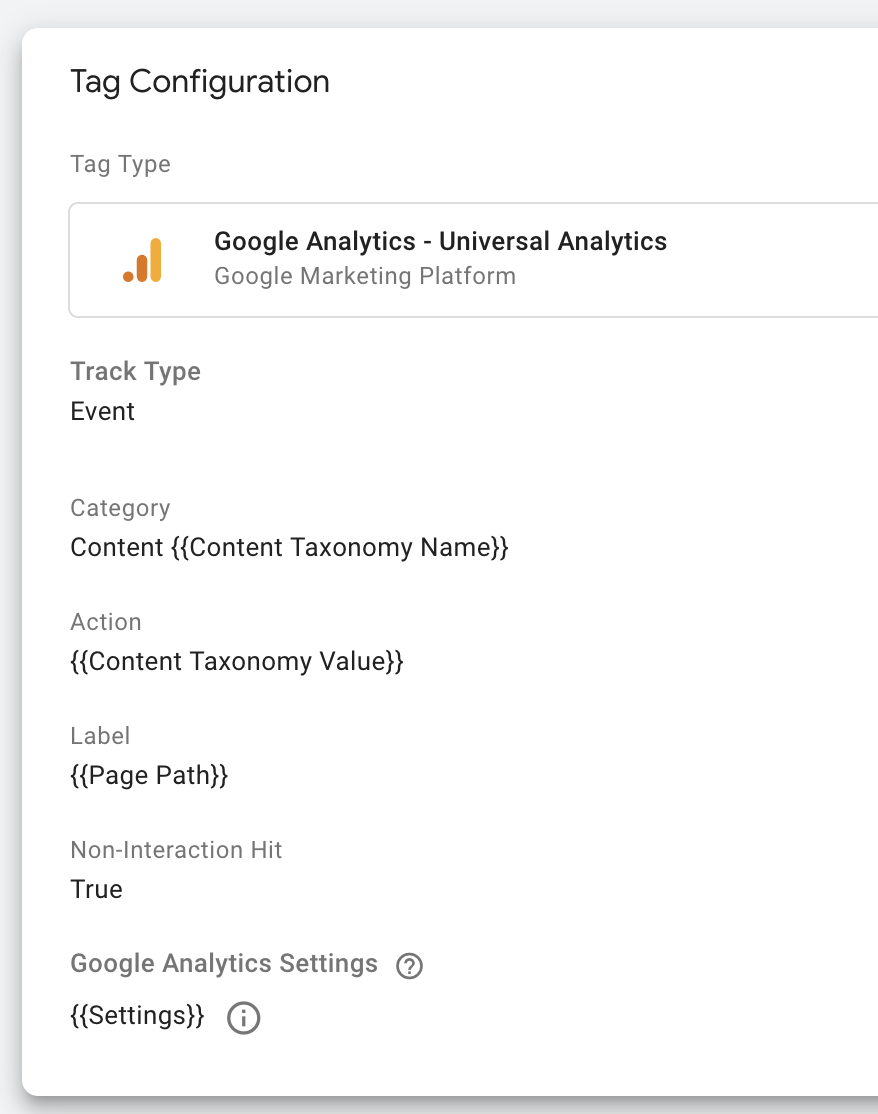
For the first category here’s what that event will look like:
Event Category = Content Categories
Event Action = python
Event Label = /post/integrate-google-sheets-and-jupyter-notebooks/
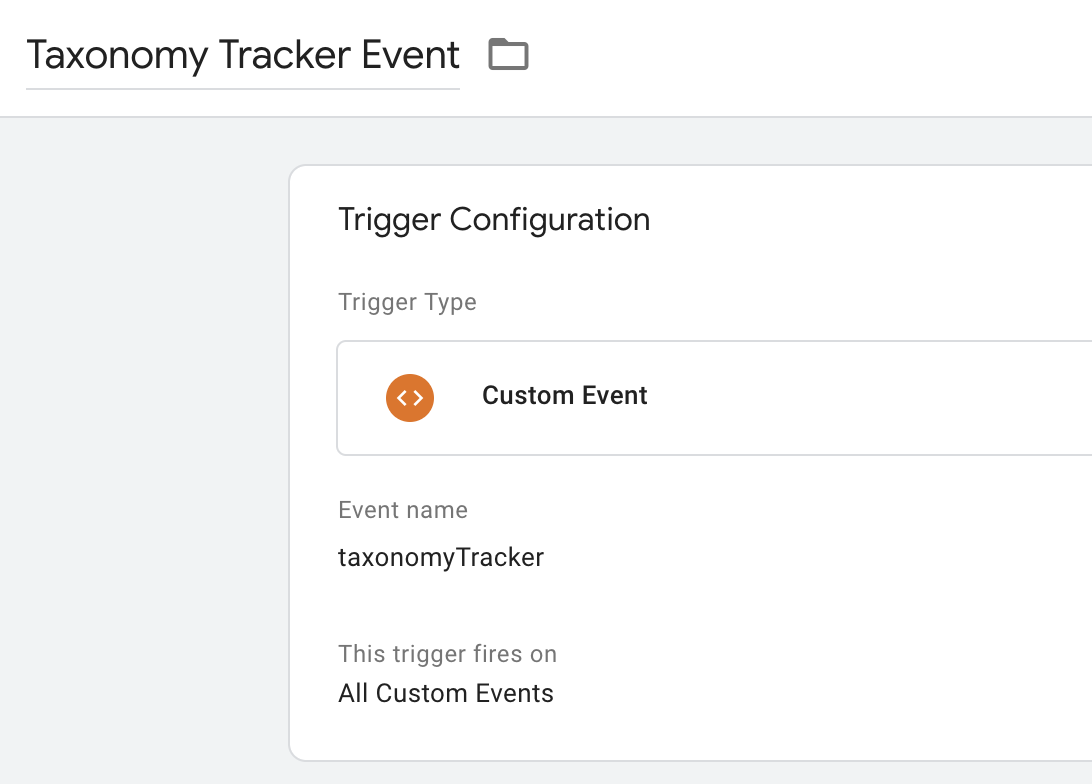
Finally, we need to trigger this event to fire for each category. To do so, we create a custom Custom Event trigger with event name = "taxonomyTracker" like so:
Here’s what our final tag looks like:
Now here’s the beautiful thing about the Taxonomy Tracker and Google Tag Manager custom templates generally. Notice that the above Analytics Event will fire every time a taxonomyTracker event is pushed to the datalayer. That means not only will it fire for every category in the Content Categories Taxonomy Tracker tag that we created, but it will fire for every taxonomy value in ANY Taxonomy Tracker tag that we create.
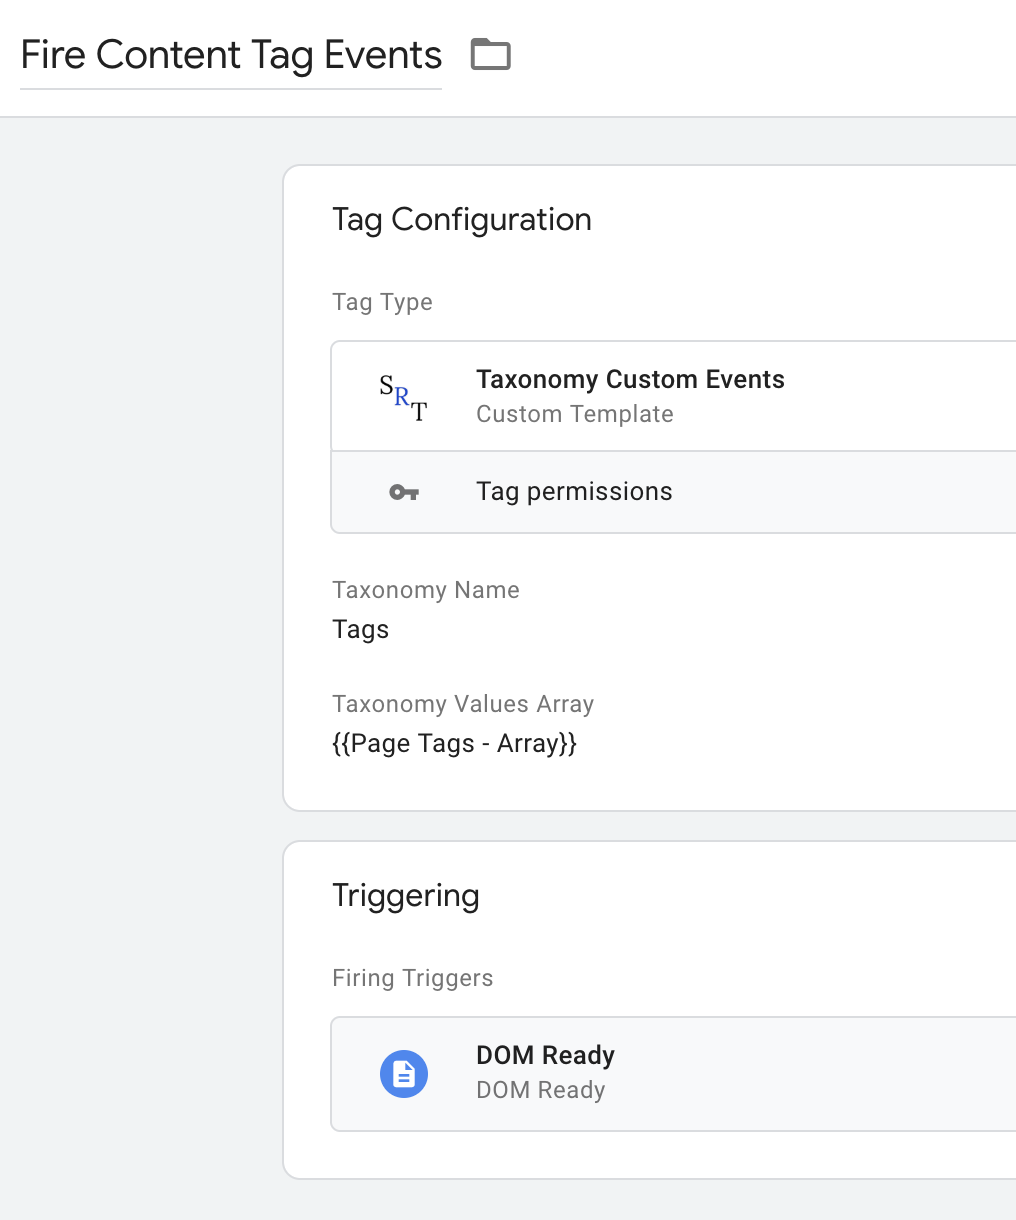
In other words, all we have to do to track our content’s tag-taxonomy (or authors or whatever other taxonomy we use) is create another Taxonomy Tracker tag. So for instance, to send our content’s tag-taxonomy data to Google Analytics we could just create a second Taxonomy Tracker that looks like this:
And the Analytics Event we already created will send the following data to Google Analytics without changing a thing.
Event Category = Content Tags

Event Action = tutorials

Event Label = /post/integrate-google-sheets-and-jupyter-notebooks/
and
Event Category = Content Tags

Event Action = jupyter notebooks

Event Label = /post/integrate-google-sheets-and-jupyter-notebooks/
..etc
Summary
Using the Taxonomy Tracker template provides a consistent yet flexible way to track taxonomies across all your content. With it, you can create graphs, see which taxonomies are popular with which readers, anything you want!
As always, please feel free to leave comments below, or reach out if you need help implementing this or anything else in Google Tag Manager.
If you’d like to use our Google Analytics Blog Package which includes the taxonomy tracker, click here.